Articles by "Manufacturing Module"

Showing posts with label Manufacturing Module. Show all posts

Subcontracting Posting Error while receiving Items

In the case of receiving 2items in the subcontracting procedure only first line material is shown in the GRN properly. Second item w'nt be displayed in the normal database this can be over come by the following type of customization. 

  1. Open the Codeunit 90 Purch.-Post
  2. In the OnRun(VAR Rec : Record "Purchase Header") function first you have to identify following code.

    PurchLine.RESET; 
    PurchLine.SETRANGE("Document Type","Document Type");
    PurchLine.SETRANGE("Document No.","No.");
    LineCount := 0; 
    AmountAddedtoVendor := 0; 
    SrcCurrAmountAddedtoVendor := 0;
  3. Now you can replace this by following type of codes

PurchLine.RESET; 
PurchLine.SETRANGE("Document Type","Document Type");
PurchLine.SETRANGE("Document No.","No.");

IF Subcontracting THEN // add line
PurchLine.SETRANGE("Line No.",SubConPostLine); // addline
LineCount := 0; 
AmountAddedtoVendor := 0; 
SrcCurrAmountAddedtoVendor := 0;

After doing this you can able to receive more than 1 items using Subcontracting.

Exchange Production BOM Item Batch Job
To open this you have to goto Manufacturing --> Production Design --> Production BOM Item
You can use this batch job to replace items, which are no longer used in production BOMs. You can exchange an item, for example, with a new item or a new production BOM. You can create new versions while exchanging an item in the production BOMs. The program automatically generates these new versions.
You can determine what is used in the batch job by filling in the fields on the Options tab. Fill in the fields as follows
Options
Exchange Type: Enter what is to be exchanged here - Item or Production BOM.
Exchange No.: Enter the item number or the production BOM number, which is to be exchanged or click the AssistButton to the right of the field.
With Type: Enter your new selection that will replace what you selected in the Exchange Type field - Item or Production BOM.
With No.: Enter the new item number or production BOM number that should be filled in or click the AssistButton to the right of the field.
Create New Version: Place a check mark in the field if you want to make the exchange in a new version.
Multiply Qty. With: Enter the value of a quantity change here. If the quantity is to remain the same, enter 1 here. If you enter 2, the new quantities doubled in comparison with original quantity.
Starting Date: Enter the date from which these changes are to become valid.
Recertify: Place a check mark in the field if you want the production BOM to be certified after the change.
Click OK to start the batch job. If you do not want to run the batch job now, click Cancel to close the window.

Item Picture Export and Import In Navision

To upload(Import) or Download(Export) in Navision you have follow following steps..

  1. First up all you have to open an Item Card.
  2. Then go to Item(Button)--> Picture.
  3. Click on Picture(Button)
  4. There 3 options will be there Import, Export and Delete
  5. For Upload a picture to the Item card you have to select Import option, choose the path of the impage then press Ok.
  6. For Download a picture to the Item card you have to select Export option, choose the path of the impage then press Ok.
  7. For Delete an existing picture you have to select delete option.

Note: In the Navision you can upload impage with a format *.bmp.

To Set Up Stockkeeping Units:
Open the Stockkeeping Unit Card window.
Fill in the fields on the card. The following fields are mandatory:
Item No.
Location Code and/or
Variant Code

After you have set up the first stockkeeping unit for an item, the program places a check mark in the Stockkeeping Unit Exists field on the Item Card.
Note
The information on the Stockkeeping Unit card has priority over the Item card.
To create several stockkeeping units for an item, use the Create Stockkeeping Unit batch job from Item Card-> Functions -> Create Stock Keeping Unit.

What is Stock Keeping Unit ( SKU )?
Definition- SKU (stockkeeping unit, sometimes spelled "Sku") is an identification, usually alphanumeric, of a particular product that allows it to be tracked for inventory purposes. Typically, an SKU (pronounced with the individual letters or as SKYEW) is associated with any purchasable item in a store or catalog.
You can use stockkeeping units to record information about your items for a specific location and/or a specific variant code.

Stockkeeping units are a supplement to item cards, they do not replace them, although they are related to them. Stockkeeping units allow you to differentiate information about an item for a specific location (such as a warehouse or distribution center) or a specific variant (such as different shelf numbers and different replenishment information), for the same item.
It is important to note that the information on the Stockkeeping Unit card has priority over the Item card.

What is Phantom BOM ?
Phantom BOM is the term used for BOM that used to produce sub-assemblies that are not stocked. Items or subassemblies produced from Phantom BOM are used in the later stage in the manufacturing process. Therefore, the items are produced and comsumed. It will not be stocked.
One of the benefits of phantom BOM is to reduce the levels and complexity of BOM. Please note that Phantom BOM do not linked to any Item card. Therefore it cannot be used to produce end product.

Unit Cost Calculation

  • Inventory in Navision is valued based on the Value Entries .
  • Cost is recorded in the Cost Amount (Actual) field in Value Entry table.
  • Navision will copy value from Unit Cost (LCY) field on Purchase Line / Unit Cost field on the item journal line to Cost Amount (Actual).
  • Direct Unit Cost Excl./Incl. VAT in Purchase Line / Item Journal Line is copied from Item Card Last Direct Cost.
  • For Item Journal Line, the Last Direct Cost is copied to the Unit Amount field on the item journal line.
  • Unit Cost in the Purchase Line / Journal Line is calculated based on
  1. a) Last Direct Cost
  2. b) Unit Cost
  • Formula to calculate Unit Cost (LCY) field in Purchase Line:Unit Cost (LCY) = (Direct Unit Cost - (Discount Amount / Quantity)) * (1 + Indirect Cost % / 100)) + Overhead Rate
  • Formula to calculate Unit Cost in Item Journal Line:Unit Cost = Unit Amount * (100% + Indirect Cost %) + Overhead Rate
  • For Standard Costing method, Standard Cost in Item Card will be copied to the Purchase Line Direct Unit Cost Ext./Incl. SST.
  • Summary of the flow of cost - Non Standard Cost:


Item Card (Last Direct Cost) --> Purchase Line (Direct Unit Cost Excl./Incl. SST) --> Purchase Line (Unit Cost (LCY) --> Value Entry (Cost Amount (Actual))
Item Card (Last Direct Cost) --> Item Journal Line (Unit Amount) --> Item Journal Line (Unit Cost) --> Value Entry (Cost Amount (Actual))

How to Import Or Export the BOM(Bill Of Materials) In Navision using BOM Lines?


For uploading or downloading the BOM(Bill Of Material) In the Microsoft Dynamics NAV(Navision), you have to goto


Manufacturing--> Planning--> BOM Lines


where you opened a window looks like following picture


After that in the first tab named Production BOM Line where you can filter the content you want to download like BOM number, Project, etc.

In the second tab Options can be used to specify whether you want to Import(Download) or Export(Upload) the content to the system. There first you have to select the path where you are going to import or export the data in file name field. After that in the direction field select import or export.

Then finally press Ok button to to perform Import or Export operations.

Change Substitute Item in Production Order

If you want to change the Released Production Order Components to the Substitution Item, then you must follow below mensioned steps.
1) In Production Order, click Line --> Components.

2) Make sure the Substitution Available field is visible.

3) Check the Substitution Available field. If substitution is avalaile, the Substitution Available

field will be checked.

4) Click on Line --> Substitutions and then choose an item as substitute.

Item Substitutions in Dynamics NAV(Navision) can be used when you have 2 items that are similar and can be used to substitute each other. When you create a work order that using an Item can be interchangable or when you create a sales order for either one of the item, you want to know the inventory level of the other item if the item that you want to sell is out of stock or in shortage. With this information, you can use the substitute item in the sales order instead. This will help you avoid losing sales due to item shortage or out of stock.
Navision allow you to link two or more items together as subsitutes if you have purchased the 'Inventory - Item Substitutions' granule.
To setup the Item Substitution:
1) Open Item Card.
2) In the Item Card, click Item --Substitutions.
3) Enter the Substitute item in the Item Substitution Entry window.
Item Substitution
You can substitute an item with Item or Nonstock Item by defining it at the SubType field. The Interchangeable field indicates whether the item and substitute can be interchange or not. The item and substitute are interchangeable if a check mark is placed in the Interchanceable field. The condition field is to indicate whether comment is entered for this substitution or not. To enter comment for the conditions, click on the Condition button to open the Condition window and then enter your comment as the condition.
Please note that the condition is just a comment.
The Item Substitution Entry is stored in Table 5715 - Item Substitution.

Create Routing Links In Navision

Routing links can be made to connect components to specific operations in order to retain their relationship even though the production BOM and/or routing are modified. It also facilitates more just-in-time flushing of components, namely when the specific linked operation starts - not when the entire order is released.

Another important benefit is that linked components and operations are displayed in a logical process structure when using the production journal for output and consumption posting.

Creation of a new routing link must be initiated from the routing:
To Create Routing Links

  1. Go to the routing that contains the operation(s) you wish to link.
  2. Make sure the routing is Under Development, and add the Routing Link Code field to your view (right-click and select Choose Column).
  3. On the relevant operation (routing line), look up from the Routing Link Code field and select a code.
  4. Proceed to add different routing link codes to other operations in the routing – if relevant.
    Note: You should not use the same routing link code in different operations on a routing because you may wrongly link a component to two different operations and thereby consume it twice.
    It is a good idea to name the routing link code after the operation in order to ensure operation-specific routing links.
  5. Certify the routing.
    Routing link codes are now assigned to operations, and you must then create the actual links by assigning the same codes to specific components:
  6. Go to the production BOM which contains the component(s) you wish to link to the above operation(s).
  7. Make sure the production BOM is Under Development, and add the Routing Link Code field to your view (View, Show Columns).
  8. On the relevant component (production BOM line), look up from the Routing Link Code field and select the code assigned to the relevant operation (see above).
  9. Proceed to add routing link codes to other components according to the unique operations where they are used.
  10. Certify the production BOM.


Note: To enable the routing links on an existing production order, you must first refresh it.
The selected components will now be linked to the selected operations when you create and/or refresh a production order using the production BOM and routing in question. This is visible in the Prod. Order Components window under the production order, and here you can also remove and add the defined routing link codes at any time.

Released Production Order In Navision


This planning function calculates changes made to a production order header and does not involve production BOM levels.

The Refresh function basically calculates and initiates the values of the component lines and routing lines based on the master data defined in the assigned production BOM and routing and according to the order quantity and due date on the production order’s header. It is typically used after you have:
  • created a production order header manually – to calculate and create line data for the first time.
  • made changes to the production order header – to recalculate all the line data.

Note: You can change component lines and routing lines “on the fly” and the production order schedule is updated accordingly. When you refresh, those changes are cancelled as the order is reset according to master data.
To Refresh a Production Order
1. Create a new production order header or change the Quantity or Due Date fields on an existing one.
2. Click Actions, Functions, Refresh.

In the Refresh Production Order window, on the Options FastTab, define how and what to refresh:
3. In the Scheduling Direction field, select:
  • Back – to calculate the operation sequence backwards from the earliest possible ending date (defined by due date and/or other scheduled orders) to the latest possible starting date.Note: This default option is relevant in the majority of situations.
  • Forward – to calculate the operation sequence forward from the latest possible starting date (defined by due date and/or other scheduled orders) to the earliest possible ending date.Note: This option is relevant for ASAP orders.
4. Select in the Calculate field which parts of the production order to calculate when refreshing.
5. Place a check mark in the Warehouse – Create Inbound Request field, to create a warehouse request for the putting away of the production order's components. Note: The warehouse location must be set up to require put-away processing but not directed put-away and pick.
6. Click OK to start the Refresh function according to your settings.

Note: It is not allowed to refresh a reserved production order. You can restore the reservation after the production order is refreshed, but in that case you should cancel the reservation before you refresh.

Note: Changes implemented with the Refresh function are very likely to change the capacity need of the production order and you may therefore have to reschedule operations afterwards.

Types of Subcontracting procedure in the Microsoft Dynamics Navision

Microsoft Dynamics NAV having mainly 2 types of Subcontracting Orders handling


  • Subcontracting Order given to the out side company

In this type of Subcontracting we are giving partial or full material to Outside company and that company doing some work for us and finally sending the product to us. This is the most important type of Subcontracting. This procedure is as follows.

a) Create a Subcontractor Location

Create a Subcontracting Location from the Location Card

Warehouse->Setup->Locations.

Fill the details as per normal Location creation procedure only difference is that you have to go to the Tax Information Tab there you select the Subcontracting Location as shown in the picture.

b) Create a Vendor Card

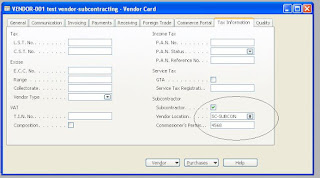
Create the Subcontractor as vendor as normal procedure. After that you have to attach the vendor to Subcontracting Location from the Tax information Tab in the Vendor card. Where you have to select subcontractor, Subcontracting Location that we created just now and Commisioners Permission details. For more information see the the picture.

c) Create Work Center

This is the one of the most important area where specifiying the work center area. Better you create one work center for one Subcontractor. For that go to the Workcenter Card from

Manufacturing --> Capacities-> Work Centers.

In that press F3 to create a new work center and enter the information based upon your need only difference is that in the Posting Tab you have to select the Subcontractor No.

d) Create a BOM

Create Production BOM for the subcontractor from Manufacturing -> Production Design -> Production BOM. Where you specify the materials that given outside for jobwork/Subcontracting Work.

e) Create a Routing

Create a Routing from Manufacturing->Capacities->Routing.
Where you specify the Work Center No. as subcontracting work center just now we created.
Attch the BOM and routing no to the Item Crad, ie, in the Replenishment Tab

f) Create a Released Production Order

Create a Released Production oder from Manufacturing->Execution->Released Production Orders or MRP.

g) Run Subcontracting Work Sheet

Open the Subcontracting Work Sheet from Purchase->Order Processing-> Subcontracting Work Sheet,
After that click Functions(Button)-> Calculate Subcontracts, in that window you have to specify the work center number in the Work Center Tab and Production Order in the production Order Routing Line Tab after that press Ok, to calculate the number of subcontracting lines.
Then the Subcontractor Lines will appear in the Subcontracting Work Sheet then you have to click Functions(Button)-> Carry Out Action Message. After that the Subcontracting Order will be created.


h) Material Issue Or Sending Material to Subcontractor

Open Subcontracting Order from Purchase->Order Processing-> Subcontracting Order
You have to click Line->Order SubCon. Details
Go to the Delivery Details Tab , enter
Delivery component for -: as number components material you are sending
Then click Function->Update Issue Details then automatically update the material to be issued. After that click Send(Button) to send the material, then system automatically create the DC for the material.

i) Receiving Materials Or Receiving Material from Subcontractor

For Receiving materials again got to the Line->Order SubCon. Details From Subcontracting Order. In that enter the Vendor Shipment No. & Posting Date. Then go to the Receipt Details tab, there enter Qty To Accept, Qty To Reject etc like information.
Finally click Function-> Update Receipt Deatails to update the consumption qty lines also. Then click the Receive Button to receiving material. You can take the print of the GRN form the noramal way.


  • Other company given Subcontracting to Us
In this case Subcontractor giving partial or full Raw materials free of cost to us and we process some task based upon that and produce some product. Finally we sell that product to the Subcontractor with less Consignment Material.Consignment Material is that material given by the Subcontractor free of cost.

The process is as follows


  1. Create a Vendor Card for Subcontractor
  2. Create Non-Stock Item as Materials Supplied by the Subcontractor.
  3. Inward the material using Purchase Order and Warehouse Receipt.
  4. Produce the product by normal procedure.
  5. In the sales order you have to specify one more extra line as G/L account consignment as -ve entry.
  6. Better you have to design a separate Report for consignment Sales Invoice.


SUBCONTRACTING

Most of the persons are confuse about subcontracting, for helping those people, here by adding some relevant ideas of What is Subcontracting? and How many types of Subcontracting procedure in the Microsoft Dynamics NAV/Navision? , etc.

What is Subcontracting?


Subcontracting is a type of work contract that seeks to outsource certain types of work to other companies. This is a step down from general contracting, which is a contract overseeing a much broader project in many cases. Subcontracting is done when the general contractor does not have the time or skills to perform certain tasks.
When a building is being constructed, subcontracting becomes a major deal. A general contractor may take care of a number of tasks, including the brick-and-mortar construction, but look to subcontractors for other types of tasks, especially things like plumbing and electrical work. These disciplines are nearly always subcontracted out.

Larger contractors may be able to handle the plumbing and electrical work as well, without subcontracting. However, these companies are rare not only because of the expertise involved, but the desire to focus primarily in one area. If a contractor has too many disciplines, the thought may be that it is not clearly focusing its efforts on quality in one particular area.
In some cases, a general contractor may only be used as the construction manager or supervisor. In that case, subcontracting accounts for all of the physical work done on the premises. The general contractor's only responsibility is to approve the contacts, keep the project within budget and inspect the work.

Subcontracting, while prevalent in the construction industry, is also used in a number of other industries. For example, with trucking companies, there may be a time when a specific type of truck needs to be used or there simply are not enough drivers to cover all the routes. In this case, a subcontractor may be called in to help. This type of subcontracting can be a permanent, as needed, situation or done simply on a one-time basis, depending on the needs of both the company and subcontractor.

Subcontracting is also important for manufacturers making a number of products from complex components. Computer manufacturers and automobile manufacturers often use subcontractors to supply parts. In an automobile, the engine may come from one company, and the transmission from another. They are then put together in a complete package at the manufacturing facility.
Subcontracting offers a number of advantages. First, it allows work on more than one phase of the project to be done at once, often leading to a quicker completion. Second, because subcontractors already have the expertise and equipment to provide the service, it is often much cheaper for them to do so than a general contractor to acquire those skills and equipment. Finally, the subcontractor is usually able to work with a general contractor on more than one project, thus creating a savings for both in the long run as a relationship is formed.

How many types of Subcontracting procedure in the Microsoft Dynamics NAV/Navision?
Microsoft Dynamics NAV having mainly 2 types of Subcontrcating Orders hadling

1.) Subcontracting Order given to the out side company

2.) Other company given Subcontracting to Us

For more information about this click here to goto Subcontracting In Navision.

Most of the persons having confusion about Item Tracking in Dynamics NAV/Navision, for solving that in this blog explains about, How to setup the Item tracking procedure in Navision, Assigning Serial And Lot Numbers In the Work Order for Item Tracking, Posting FG From Output Journal in the case of Item Tracking, Posting Shipment (Sales Order Posting) difference when its a Item Tracking type of Sales.
Setup
Select the Item, for which Serial No: and Lot No: tracking required.
Then Select the Item Tracking Tab from The Item Card.

Place the cursor in the Item Tracking Code field and press F6. Then, a window will appear where you have to specify the Item Tracking code and Description.
Then select the Item Tracking (Button) -->Card. Specify the details as below.

Assigning Lot Numbers

This is the major setup area.
Go to Serial No: Tab; Select the options you needed to track.
After that go to Lot No: Tab, select the options you required.
Then, Misc Tab, for Expiry Date setup.
Then Press ESC to close the Window and Select the Code You given and Press OK.

Then click on the Serial No. & Lot No. Fields in the Item Tracking Tab (Of Item Card) and assign number series for each of them respectively.
Enter the Expiration Calculation information if needed.

Assigning Serial And Lot Numbers In the Work Order

Release or Select the work order that needed to assign Serial & Lot Numbers

Go to Line-->Item Tracking Lines
  • For auto generate Serial Number and Lot Number follow below procedure

    Select Functions-->Assign Serial No

    Enter the value in ‘Quantity to Create’ Field (How many Items required to assign Serial No :).
If you want to create a new Lot Number then select the Create New Lot No. Field. After that Press OK, then the System will generate Serial No’s For the Qty, automatically.
  • For manually generate Serial Number and Lot Number follow below procedure

    Select the Functions-->Create Customized SN

    Then following kind of window will appear.

    Enter Customized SN (Customized Serial Number), Increment, Quantity to Create (how many items needed to create the Serial Number), Create New Lot No (If a new Lot No Req.) and press OK, then the System will generate Serial No’s For the Qty, automatically with Your Customized Serial No: .

Posting FG From Output Journal

Go to the Manufacturing-->Execution-->Output Journal
Enter the Release Production Order Number in the ‘Production Order Number’ Field and then select Function-->Explode Routing.

Enter the Output Qty to post,
Then go to Line-->Item Tracking Lines to view the tracking details.

Then you will get following type of page showing tracking details

Then Post It.

Posting Shipment (Sales Order Posting)

Go to the Sales Order select the Item, then go to

Line-->Item Tracking Lines

Then select the Serial Number field to select the appropriate Serial Number for Shipment and press ESC.

Rests of the procedures are same For Shipment and Invoicing.

The Subcontractor Step By Step Process is as follows :


  • Set up a subcontractor
  • Setup a location for that sub contractror
  • Set up subcontractor cost by subcontractor or by process
  • Set up a routing with a subcontractor
  • Process a production order with a subcontractor
  • Determine when a purchase order is related to a production order
  • Determine the status of subcontractor operations on released production Orders
  • Send the Raw materials to subcontractor .
  • Receive the FG materials from Subcontractor
  • Create the Invoice for that services
  • Pay the amount to Vendor against Invoice

Production BOM In Dynamics NAV

Production BOM contains the list of items needed to make an item. The items used as input are known as components while the output item could be a finished good or a sub assembly (to be used an component for to produce another item).Single-level production BOM means all components used are purchased. Multi-level production BOM consist of one or more sub assembly as the components. Navision can support up to 50 levels BOM.
  • BOM is a document to describes the components used to manufacture a product.
  • BOM in Navision can contains multiple levels. The maximum level in Navision is 50
  • BOM can only be defined after all components (items) have been created in Navision.

BOM Status

In the Production Header, you can set the status for a BOM. There are 4 BOM status in Navision Production BOM.
  1. New - Automatically set when you create a new BOM. Content in the BOM can be edited.
  2. Certified - After you have confirm with the content of the BOM, you have to change the status to Certified. Only certified BOM can be used in Production Planning. Content in certified BOM cannot be changed. Usually, a new version of BOM will be created if changes are needed on the components.
  3. Under Development - If you want to change the content of a certified BOM, you must change the status of the BOM to Under Development. After the changes have been done, change the status back to Certified.
  4. Closed - The BOM no longer in use.

If you want to create a BOM that is similar to existing BOM, you can use the Copy BOM function to copy the existing BOM lines to the new BOM. After copy the BOM lines, you can make changes to the lines to suite your new BOM.

To create a new BOM from existing BOM:
  1. Go to MANUFACTURING --> PRODUCT DESIGN --> PRODUCTION BOM
  2. Press F3 to create a new Production BOM.
  3. Enter a new BOM number in the Number field. It is recommended to use manual number in BOM number field so that you can choose a meaningful and easy to remember BOM number.
  4. Fill in the Description field.
  5. Select a Unit of Measure.
  6. Click on Function --> Copy BOM.
  7. Choose the Production that you want to copy from and then click on the OK button. This will copy all the component lines to the new Production BOM.
  8. Change the component lines to suit your new new Production BOM.
  9. After you have finalized on the Production BOM, change the Status field in the header to

If you want to change the Production BOM lines that has been certified, you must first set the Status to 'Under Development' because Production BOM with the 'Certified' status cannot be changed. After changes have been done, you must set the status back to 'Certified' so that the BOM is available for use.
If you change the BOM lines with this method, you will loose the previous BOM lines information. This method work fine if you find that the BOM lines have been set incorrectly and you want to correct it. But in the case where your company want to adjust or change the BOM components, this method is not suitable because you will loose the previous BOM components once the new changes have been saved. Usually, company will want to keep the original BOM components as reference when adjustment or changes are made to the BOM. Rather than create a new BOM for the new formulation, Navision allow you to update the existing BOM with a version.
To create a new BOM version:
1) Open the Production BOM that you want to change.
2) Click on Prod. BOM --> Versions.
3) Enter a Version No.
4) Fill in the Description field.
5) Select a Unit of Measure.
6) In the Starting Date field, enter a date where the new BOM will take effect. If Production Order is created before the date specified in the Starting Date field, Navision will use the original BOM.
7) Click Function --> BOM Header and the select Yes to copy the Production BOM.
8) Change the component lines according to your new BOM requirements.
9) Set the Status to 'Certified'.
10) Yes, the new version has been created. Close the Version window to return to the Production BOM Card.
Note: The Active Version field in the Production BOM card will show the currently active version.

A work center card organizes the fixed values and requirements of the production resource in question, and thus governs the output of production performed in that work center.
Prerequisites
Capacity units of measure are set up.
  • At least one work center group is set up (under Capacities, Setup). A shop calendar is created
  • Gather all data about your production resources.

To Fill in the General FastTab
1. From the Work Center list page, click New to open a new, empty work center card.
2. In the No. field, number the work center (for example 100).
3. In the Description field, name the work center (for example Cutting).
4. Look up in the Work Center Group field and select the higher-level resource grouping that the work center is organized under.In the Blocked field you can place a check mark to define that the work center can not be used in any way by the system. This means, among others, that an item produced at the work center can not be posted from a production journal

To Fill in the Posting FastTab
1. In the Direct Unit Cost field, enter the cost of producing one unit of measure at this work center, excluding any other cost elements. This cost is often referred to as the “direct labor rate”.
2. In the Indirect Cost % field you can enter the general operation costs of using the work center as a percentage of the direct unit cost. This percentage amount is added to the direct cost in the calculation of the unit cost.
3. In the Overhead Rate field you can enter any non-operational costs, for example maintenance expenses, of the work center as an absolute amount.
4. The Unit Cost field contains the calculated unit cost of producing one unit of measure at this work center, including all cost elements. Unit Cost = Direct Unit Cost + (Direct Unit Cost x Indirect Cost %) + Overhead Rate.
5. In the Unit Cost Calculation field, define whether the above calculation should be based on the amount of time used: Time, or on the number of produced units: Units.
6. Place a check mark in the Specific Unit Cost field if you want to define the work center’s unit cost on the routing line where it is being used. This may be relevant for operations with dramatically different capacity cost than what would normally be processed at that work center.In the Flushing Method field, select whether output and process times at this work center should be calculated and posted manually; Manual, or automatically with either of the following methods:Forward to have the program automatically calculate and post consumption when the production order is released. Backward to have the program calculate and post consumption automatically when the released production order is finished.
Note: If necessary, the flushing method selected here and on the item card, can be overridden for individual operations by changing the setting on routing lines.
The Department Code and Project Code fields relate to the use of dimensions.
To Fill in the Scheduling FastTab
1. In the Unit of Measure Code field, enter the time unit in which this work center’s cost calculation and capacity planning are made.
2. In the Capacity field you can define whether the work center has more than one machine or person working at the same time. (If your Microsoft Dynamics NAV installation does not include the Machine Center granule then the value in this field must be 1)
3. In the Efficiency field, enter the percentage of the expected standard output that this work center actually outputs. If you enter 100, it means that the work center has an actual output that is the same as the standard output.
Note: The Consolidated Calendar field is only relevant if the installation includes the Machine Centers granule.
4. Look up in the Shop Calendar Code field and select a shop calendar.
5. In the Queue Time field you can specify a fixed time span that must pass before assigned work can begin at this work center. Note that Queue Time is added to other non-productive time elements such as Wait Time and Move Time that you may define on routing lines using this work center.
6. If you use the Queue Time field above then you must define a time unit of measure in the Queue Time Unit of Meas. Code field.

A work center calendar specifies the working days/hours, shifts, holidays, and absence that determine the work center’s gross available capacity (measured in time) according to its defined efficiency and capacity values. Creating and enabling a work center calendar involves a few preparatory tasks:

As a foundation for calculating a specific work center calendar, you must first set up one or more general shop calendars. A shop calendar defines a standard working week in terms of starting and ending times of each working day and its work shift relation. In addition, the shop calendar defines the fixed holidays during a year.

To Create Work Shifts
Even if your work centers do not work in different work shifts, the system requires at least one work shift code.
1. From the Capacities menu, open the Work Shifts window.
2. On a blank line, enter a number in the Code field to identify the work shift (for example 1).
3. Describe the work shift in the Description field (for example 1st shift).
4. Continue to fill in lines for a second or third work shift if relevant.

To Set up a Shop Calendar
1. From the Capacities menu, click Setup, Shop Calendars to open the Shop Calendars window.
2. On a blank line, enter a number in the Code field to identify the shop calendar (for example 1).
3. Describe the shop calendar in the Description field (for example One shift Monday-Friday).

The initial naming of the new shop calendar is done and we can proceed to define its contents:
4. Select the new line, click Related Information, Shop Cal., Working Days to open a blank Shop Calendar Working Days window with the name defined above.
5. Proceed to define a complete working week with the starting and ending times of each day and the work shift code that each line relates to, for example:
Monday 07:00 15:00 1
Tuesday 07:00 15:00 1
etc.

If you need a shop calendar with 2 work shifts, you must fill it in like this example:

Monday 07:00 15:00 1
Monday 15:00 23:00 2
Tuesday 07:00 15:00 1
Tuesday 15:00 23:00 2
etc.

Any week days that you do not define in the shop calendar, for example Saturday and Sunday, are simply considered non-working days and will have zero available capacity in a work center calendar.
When all the working days of a week are defined, you can close the Shop Calendar Working Days window and proceed to enter holidays:
6. Back in the Shop Calendars window, select the new shop calendar line and click Related Information, Shop Cal., Holidays to open the shop Calendar Holidays window.
7. Proceed to define the holidays of the year by entering starting date/time and ending time and description of each holiday on individual lines, for example:
04/07/04 0:00:00 23:59:00 Summer Holiday
05/07/04 0:00:00 23:59:00 Summer Holiday
06/07/04 0:00:00 23:59:00 Summer Holiday

The defined holidays will have zero available capacity in a work center calendar.

The shop calendar can now be assigned to a work center in order to calculate the work shop calendar that will govern all operation scheduling over time at that work center.

To Calculate a Work Center Calendar
1. On a work center card, go to the Scheduling FastTab and select in the Shop Calendar Code field which shop calendar to use as the foundation for a work center calendar at this work center (for example One shift Monday-Friday).
2. Click Related Information, Planning, Calendar to open the Work Center Calendar window.
The left side of the window lists the work centers that are set up. The right side shows a time calendar displaying the available capacity values per working day in the defined unit of measure, for example 480 (minutes). Each line represents the calendar of one work center.

Note: You can also select to view the capacity values per week or month by selecting another value in the View By field in the Matrix Options area.

Our newly created and assigned shop calendar is not yet reflected in the calendar line of the selected work center – it must first be calculated:
3. Click Actions, Functions, Calculate to open the Calculate Work Center Calendar request from.
4. On the Work Center FastTab you can place a filter to only calculate for one work center. If you do not filter, all existing work center calendars will be calculated.
5. On the Options FastTab, define the starting and ending dates of the calendar period that should be calculated, for example one year; from 01/01/04 to 31/12/04. Then click OK to calculate.
Calendar entries are now created (or updated) showing the available capacity per day (or other period) according to the following 3 sets of master data:

  • The working days and shift defined in the assigned shop calendar
  • The value in the Capacity field on the work center card
  • The value in the Efficiency field on the work center card.


The calculated work center calendar will now define when and how much capacity is available at this work center, and as such, it governs the detailed scheduling of operations performed at the work center.
To Record Work Center Absence
In addition to the non-working time defined in the shop calendar, you can define absence time directly in the calculated work center calendar:
1. In the Work Center Calendar window, select the work center and calendar day when the absence time should be recorded and then click Related Information, Planning, Absence.
1. In the Absence window, define the starting time, ending time and description of that day’s absence, e.g.:25/01/01 08:00 10:00 Maintenance
2. Click Related Information, Absence, Update and close the Absence window.
The capacity of the selected day has now decreased by the recorded absence time.

Jubel Thomas

{picture#https://plus.google.com/u/0/photos/116645982191572612106/albums/profile/5718535508567382818} Having 9+ years of Dynamics NAV Experience with Modules like Finance, Sales, Manufacturing, Warehouse, Purchase, Human Resource etc. Also know LS retail, Dynamics AX, Business Intelligence. {facebook#https://www.facebook.com/Navision-Planet-347570178709579/} {twitter#https://twitter.com/NavisionPlanet}

Contact Form

Name

Email *

Message *

Powered by Blogger.