Articles by "Administration"

Showing posts with label Administration. Show all posts

How to Setup Business Central Development Environment?

Hope you have installed the Business Central via Docker. If not then recommended you to read Dynamics  365 Business Central Install using Docker post.

In this post I would like to share the following details related to Visual Studio Code setup to start the development for Business Central with AL coding.
Visual Studio Code is the open source coding editor from Microsoft. By the help of this software we can start coding for any language by the help of extensions.  This software will work on Operating systems like Windows, Linux and Mac OS. It support features like syntax highlighting, intelligent code completion, snippets, code refactoring and Git hub connection etc.
Visual Studio Code
Visual Studio Code

You can download the Visual studio code from Microsoft Visual Studio Code Free Download

Step 2 : Download Certificate and Install

After installing the Visual studio code and download the Certificate from the path specified on docker run command result like follows.
Certificate Path
Certificate Path
Copy the path specified on your docker run command and paste it on a browser to download the same. Check the same file on download folder with extension ".cer". 
Congrats now you are having self signed certificate to install

Install Certificate

Now we will see how to install this certificate using following following steps and Images

  • Step 1 : Locate the file and right click. Click on Install  Certificate option
  • Step 2 : Select Local Machine option and click on Next button
  • Step 3 : Choose Trusted Certificate and press Next to Import the same.
  • Step 4 : Well done Certificate Installation completed

Certificate Install step1 and 2
Certificate Install Step 1 and Step 2


Step 3 - Trusted Certificate Assign
Certificate Install Step 3 - Trusted Certificate Assign 

Step 3 : Install AL Extension

So the next steps is to install the AL Extension on Visual Studio Code interface. For doing the same follows below steps
  • Open Visual Studio Code
  • Click on Extensions or press (Ctrl + Shift + X)
  • After that search for "AL Language"
  • Press Install button to install the same
AL Extension Installation on Visual Studio Code
AL Extension Installation

Step 4 : Install VSIX Extension


VSIX Installations steps explained as follows
  • Download the VSIX file from docker run command result
vsix file path
vsix file path 

  • Open Visual Studio Code
  • Open command Palette (view -> Command Palatte or Ctrl + Shift + P)
  • Enter command as "Extension:Install from VSIX"
  • Select the VSIX file downloaded via first step of this activity
  • Press "Install"   to complete the same
Congrats you have now successfully complete VSIX file install. Lets continue with next step

Step 5 : launch.json Settings

Now you have to update the connection settings details on Visual studio code to connect both Business Central and Visual studio code together. For that please follow below steps

  • Copy the Docker run command result with "Dev. Server : " value
  • Open Visual Studio Code
  • Locate "launch.json" file 
  • Update the "Server" parameter settings
  • replace the existing path with new path and save
launch.json file setup to connect business central
launch.json file Setup
Congrats now to you have completed the launch.json file setup. Let us continue with last step in this series

Step 6 : Download Symbols


Download symbols steps required to download the object reference details to compile the objects you are going to develop.
Following are the steps to complete the same

  • Open Visual Studio Code
  • Open command Palette (view -> Command Palatte or Ctrl + Shift + P)
  • Enter "AL:Download Symbols" to download the symbols
  • When system asked for credentials , Enter the User ID = Admin and Password: (this is the password available on Docker run command result, please copy the same and paste it here"
  • After successfully verified the authorization system will download the symbols.
After successfully Download Symbols can able to confirm Alpackages
After successfully Downloaded Symbols can able to confirm Alpackages

After successfully Downloaded Symbols can able to confirm Alpackages mentioned on the above image.

Congrats now you are ready to start the extension development for Business Central. Cheers !!

Microsoft Dynamics 365 -  Business Central Installation using Docker FREE

Now we can install the Dynamics Business Central / Dynamics NAV versions FREE for Demo and test interface. Yes you heard is right its absolutely Free. In this post I will explain this exciting feature to you.

Before starting this post hope you have aware of Docker software, if not then request you to visit our Docker and Containers for Microsoft Dynamics

How to Install D 365 - Business Central on Local Machine for Free ?

First up all need to understand that from Business Central on-wards Microsoft not providing downloadable setups directly from partner source like earlier routine followed by Microsoft ERP.

Docker is one of the way to setup the Business Central on Local computer. Advantage over normal installation is that it will allow to install and execute multiple CUs parallel in few minutes.

Step 1: Install and Activate Docker Software ( If already exist Docker then skip this step )

First step to prepare the interface for Business Central is to install the Docker software. Before start installing docker please understand like other software's Docker too required some basic setups need to enable on system. Those details are as follows

Pre-requisites for Docker Installation

  • Make sure on BIOS setup activated the Virtual machine feature.
BIOS Setup to enable Virtualization

  • Activate Container and  Microsoft-Hyper-V options on "Turn Windows Features On or Off"
Windows features page to enable Containers and Hyper V
Windows features page
  • Windows 10 or higher for Laptops and Desktops and Windows 2016 Server or higher for server machines.

Lets start the Docker Installation steps


You can directly download the docker software from Docker or by the help of following scripts

Docker Direct Download Steps

  1. Download Docker.
  2. Double-click InstallDocker.msi to run the installer.
  3. Follow the Install Wizard: accept the license, authorize the installer, and proceed with the install.
  4. Click Finish to launch Docker.
  5. Docker starts automatically.
  6. Docker loads a “Welcome” window giving you tips and access to the Docker documentation.

For more information visit Docker website for Windows 10 docker software
                                                        OR
Install Docker using script
Except BIOS setup we can activate the required setup using following script. All you have to do it run this command in Administrator via ISE or Command Promt

Enable-WindowsOptionalFeature -Online -FeatureName Microsoft-Hyper-V, Containers -All
Set-ExecutionPolicy Bypass -Scope Process -Force; iex ((New-Object System.Net.WebClient).DownloadString('https://chocolatey.org/install.ps1'))
choco feature enable -n allowGlobalConfirmation
choco install visualstudiocode 
choco install docker-for-windows
Restart-Computer -Force

Once the Docker is installed it will show like following icon.
Docker Installation Completed and activated on windows
Docker Running


Step 2 : Pull Dynamics Business Central Image

This is the first step after Docker installation and activated. By the help of this step we will download the Image for the Dynamics 365 Business Central Image.

For downloading the Docker image you have to copy the following script code and placed on ISE or Command Prompt with Administrator.

docker pull microsoft/bcsandbox:us

Where "docker pull" is the pull command and Image Name to be downloaded is  "microsoft/bcsandbox:us". Keyword "us" stands for country.  If you remove this system will download w1 version default. Similarly if you have mention "uk" instead of "us" then considered as United Kingdom Business Central Image.

Once the "Pull" command executed it will take sometime to complete the same. 

For the Business Central installation it will take download file size as 12 GB approx and after extraction around 16 GB as on August 2018.

Approx time for this activity first time where none of the Dynamics NAV Images available machine is around 3hrs to 6 hrs depend upon network speed. Total file downloading size is      12 GB+

Step 3 : Run Dynamics Business Central Image

You can run and execute the Dynamics Central image as container just have process the command 

docker run -e accept_eula=Y -m 3G microsoft/bcsandbox:us

Once it will run then will show the Business Central login credential details like follows

Docker Run Result - for D365 Business Central Installation
Docker Run Result - for Microsoft D365 Business Central Installation

Approx time for this activity is 2 to 10 minutes

Step 4 : Opening First Dynamics 365 Business Central Application

For opening Business Central using browser. Open any web browser like chrome and enter the URL mentioned on the Web Client mentioned on the above screen. After entering the same system will ask for User ID and Password.
Default User ID for Log in is "admin" and Password you have to check on your command result.

Sample screen after log in to Business Central is as follows

D 365 - Business Central Landing Page
D 365 - Business Central First Page (Sample)

In the upcoming post will explain how to use further.
Enjoy using new Business Central application demo for Free!!. 

If you are having further doubts feel free to raise a comment on this page.

Do you know how to install multiple Dynamics NAV / Business Control updates (CU’s) on your system and run simultaneously without using any Virtual Machines?

If not then don’t worry I am here to help you all. You are at the right place to learn now.

You can achieve this by installing new supporting software called Docker.  I will explain in these post detailed steps to installing the same and setup.  

You will get master on this area by following 2 different posts

  1. Understanding Concepts of Docker and Containers
  2. Installing Docker Software & Dynamics NAV / Business Central using Docker

What is Docker?

I know at this time most of them having question that what is docker and why its required. Keep on reading I will clear your doubts.
Docker is the company driving the container movement and the only container platform provider to address every application across the hybrid cloud. It is also the name of a software handling Containers on Linux and the name of the software which handles containers on Windows.

Before Checking installation of Docker let us understand Containers first.

Docker is the vessel by which container images are packaged and delivered. This automated process produces images (effectively templates) which may then be run anywhere on premises, in the cloud, or on a personal machine as a container.

What are Containers

Containers are a way to wrap up an application into its own isolated box. For the application in its container, it has no knowledge of any other applications or processes that exist outside of its box. Everything the application depends on to run successfully also lives inside this container. Wherever the box may move, the application will always be satisfied because it is bundled up with everything it needs to run.

Please find the following simple explanation provided by Microsoft itself.

Imagine a kitchen. We package up all the appliances and furniture, the pots and pans, the dish soap and hand towels. This is our container. We can now take this container and drop it into whatever host apartment we want, and it will be the same kitchen. All we must do is connecting electricity and water to it, and then we’re clear to start cooking (because we have all the appliances we need!)
Container Example in real life

In much the same way, containers are like this kitchen. There can be different kinds of rooms as well as many of the same kinds of rooms. What matters is that the containers come packaged up with everything they need.


Let us understand Some of the key terms before proceed further

Container Host: Physical or Virtual computer system configured with the Windows Container feature. The container host will run one or more Windows Containers.
Container Image: As modifications are made to a containers file system or registry—such as with software installation—they are captured in a sandbox.
Sandbox: Once a container has been started, all write actions such as file system modifications, registry modifications or software installations are captured in this ‘sandbox’ layer.
Container OS Image: Containers are deployed from images. The container OS image is the first layer in potentially many image layers that make up a container.
Container Repository: Each time a container image is created, the container image and its dependencies are stored in a local repository. These images can be reused many times on the container host. The container images can also be stored in a public or private registry, such as DockerHub, so that they can be used across many different container hosts.

Benefits of Docker / Container

  • From a developer’s desktop, to a testing machine, to a set of production machines, a Docker image can be created that will deploy identically across any environment in seconds.
  • Can accommodate n number of product versions & CU’s (Only Dependency is availability of resource on local system).
  • Low storage space required when we compared with Virtual Machines.
Keep on visit this blog for upcoming post related to this


Dynamics NAV PowerShell

What is Power Shell?

Built on the .NET Framework, PowerShell is a task-based command-line shell and scripting language; it is designed specifically for system administrators and power-users, to rapidly automate the administration of multiple operating systems (Linux, macOS, Unix, and Windows) and the processes related to the applications that run on those operating systems.

PowerShell is open source

PowerShell base source code is now available in GitHub and open to community contributions. 

Examples,

  • Get-Process   - Display all process running on the system
  • Clear-Host    - Clear Display 

Microsoft Dynamics NAV Power Shell


Microsoft Dynamics NAV 2016 includes Windows PowerShell cmdlets for administration and for development and file management of application object files and extension packages. 


The cmdlets are available in two Windows PowerShell modules: 

  • Microsoft Dynamics NAV 2016 Administration Shell
  • Microsoft Dynamics NAV 2016 Development Shell

Microsoft Dynamics NAV 2016 Administration Shell

The Microsoft Dynamics NAV 2016 Administration Shell includes cmdlets for administering the Microsoft Dynamics NAV deployment, such as adding and configuring Microsoft Dynamics NAV server instances, databases, and users. Also included are cmdlets for administering extension packages. The Microsoft Dynamics NAV 2016 Administration Shell is installed with the Microsoft Dynamics NAV Server.
Dynamics NAV Powershell

Microsoft Dynamics NAV 2016 Development Shell

The Microsoft Dynamics NAV 2016 Development Shell includes cmdlets for merging and modifying application object files. Also included are cmdlets for creating extension packages. The Microsoft Dynamics NAV 2016 Development Shell is installed with the Microsoft Dynamics NAV Development Environment.

Following are the Dynamics NAV modules paths needs to include while execution on Powershell tools
  • Microsoft.Dynamics.NAV.Management
  • Microsoft.Dynamics.NAV.Apps.Management
  • Microsoft.Dynamics.NAV.Apps.Tools
  • Microsoft.Dynamics.NAV.Model.Tools

Powershell Tools

By the help of Powersheell tools we are able to create / modify the powershell scripts. This can be done with various tools existing like Windows PowerShell ISE, NAV Administartor, NAV Developmentshell, Visual Studio Code etc.

The cmdlets are implemented in Windows PowerShell 3.0, which is included with Windows Server 2012 and Windows 8 and later.

Windows PowerShell ISE

  • Integrated Scripting environment
  • Multiline Editing
  • Selective Execution
  • Context-Sensitive Help
  • Debug
  • Commands Explorer
  • Snippets
  • Don’t accept shortcut parameters

VS Code

  • Multiline Editing
  • Selective Execution
  • Context-Sensitive Help
  • Debug
  • Commands Explorer
  • Snippets
  • Git Integration
Powershell Tools Comparison
Powershell Tools

Powersheel scripts are stored in ps1 extension.

You can write Your own modules or use modules that already online

Powershell Scripts

To see the cmdlets that are available for Microsoft Dynamics NAV
  • Get-Command *NAV*

To get Help about syntax and options for a specific cmdlet 
  • Get-Help   
Example, Get-Help Get-NAVServerInstance

To get online Help in the MSDN Library for a specific 
Cmdlet
  • Get-Help -online

  • The sample Windows PowerShell scripts are available in  WindowsPowerShellScripts folder on the Microsoft Dynamics NAV product media.
  • Power Shell Can be found in the NAV Service Folder with “NavAdminTool.ps1”
  • Copy as Path copying from folder
  • Press- Shift + Right Click  and then select “Copy as Path”
Windows copy as path option

How to use Windows PowerShell ISE ?

Open Windows PowerShell ISE


To open the Windows PowerShell ISE , you have to type ISE or Windows PowerShell ISE search

Once you do then will get following screen (left)
Windows PowerShell ISE in Dynamics NAV
Windows PowerShell ISE


Make sure that you have opening the Windows Power Shell in "Run as Administrator" option to get better result.

Once you open the Windows power shell need make sure right side like windows selected on Windows Power Shell on View menu (This is to make sure all the necessary windows are enabled for view and better understanding only)

Once you complete this first step is over.

2) Import the Module to activate Dynamics NAV commands

Now  our step is to Import the NAV cmdlet command via Windows Power Shell

Windows Power Shell ISE screen after NAV Module Import

Set-ExecutionPolicy unrestricted -Force
Import-Module 'C:\Program Files\Microsoft Dynamics NAV\100\Service\NavAdminTool.ps1'

For entering the command you have paste the given the command on white space available on the above screen. 

Once you enter the command just press F5 to execute or as mentioned in the image click on to the green symbol with right arrow.

Note above Query is for the Dynamics NAV 2017 version. If you want to perform the same for other versions the please copy corresponding version queries.

Dynamics NAV 2013

Set-ExecutionPolicy unrestricted -Force
Import-Module 'C:\Program Files\Microsoft Dynamics NAV\70\Service\NavAdminTool.ps1'

Dynamics NAV 2013 R2

Set-ExecutionPolicy unrestricted -Force
Import-Module 'C:\Program Files\Microsoft Dynamics NAV\71\Service\NavAdminTool.ps1'

Dynamics NAV 2015

Set-ExecutionPolicy unrestricted -Force
Import-Module 'C:\Program Files\Microsoft Dynamics NAV\80\Service\NavAdminTool.ps1'

Dynamics NAV 2016

Set-ExecutionPolicy unrestricted -Force
Import-Module 'C:\Program Files\Microsoft Dynamics NAV\90\Service\NavAdminTool.ps1'


Dynamics NAV 2017

Set-ExecutionPolicy unrestricted -Force
Import-Module 'C:\Program Files\Microsoft Dynamics NAV\100\Service\NavAdminTool.ps1'


Dynamics NAV 2018

Set-ExecutionPolicy unrestricted -Force
Import-Module 'C:\Program Files\Microsoft Dynamics NAV\110\Service\NavAdminTool.ps1'

Note: given path may different depending upon the NAV installation location

Once you execute the command system will automatically import all the necessary commands details for corresponding NAV version. So its important to import the same version module to achieve the desired the results.

3) Refresh Commands

Refresh commands is the 3rd step. For doing this you have to press Refresh on  right side Commands column available on the Windows Power Shell screen. 
Once you refreshed system will populate the Dynamics NAV commands for the imported version.

FYI specifying the important commands available with the Windows Power Shell option


  • Get-NavServerUser - Returns information about all users created in the current Microsoft Dynamics NAV database.
  • Get-NAVServerUserPermissionSet - Returns permission set information for Microsoft Dynamics NAV users.

  • New-NAVServerUser - Creates a new Microsoft Dynamics NAV user.
  • New-NAVServerUserPermissionSet - Assigns a permission set to a Microsoft Dynamics NAV user.

  • Remove-NAVServerUser - Deletes a Microsoft Dynamics NAV user.
  • Remove-NAVServerUserPermissionSet - Removes a permission set from the list of permission sets that are assigned to a Microsoft Dynamics NAV user.
  • Set-NAVServerUser - Changes the configuration settings of an existing Microsoft Dynamics NAV user.

Dynamics NAV User ID Creation and Permission Assign via Power shell

Yes. You can able to create the NAV user id as well as assign permission without log in to the SQL and Dynamics NAV Application.

All you have to do is that have to import the module as described above and enter the power shell command like below.

PS C:\Windows\system32> New-NAVServerUser -ServerInstance navdemo -WindowsAccount navisionplanet\jubel -Confirm -LicenseType Full -State Enabled


PS C:\Windows\system32> New-NAVServerUserPermissionSet -PermissionSetId SUPER -ServerInstance navdemo -WindowsAccount navisionplanet\jubel -CompanyName "Navision Planet" -Force 

Replace the following keywords exists on the above script


  • navdemo : Replace this will NAV Administration module defined NAV Instance Name
  • navisionplanet\jubel : Replace this with your "Domain Name\ User ID"
  • SUPER :- Replace this field with Permission ID you would like to add the user.
  • Navision Planet : Replace this value with NAV Company name would like to add to the user.

SQL Database Restoration via Powershell

Dynamics NAV Powershell Script to Restore one SQL Database is as follows

New-NAVDatabase -DatabaseName DBName -FilePath "SQL db back path to be mentioned here" -DatabaseServer SERVER-INSTANCE -DataFilesDestinationPath "DB Storage Path" -LogFilesDestinationPath "DB Log Path"


Copy the above power shell script and enter on Powershell editor and replace following parameters

DBName:  Name of the SQL DB required

SQL db back path to be mentioned here:  Specify the fbk file full path

DB Storage Path : Replace this with your new SQL DB path

DB Log Path: Replace this with your new SQL DB Log file path

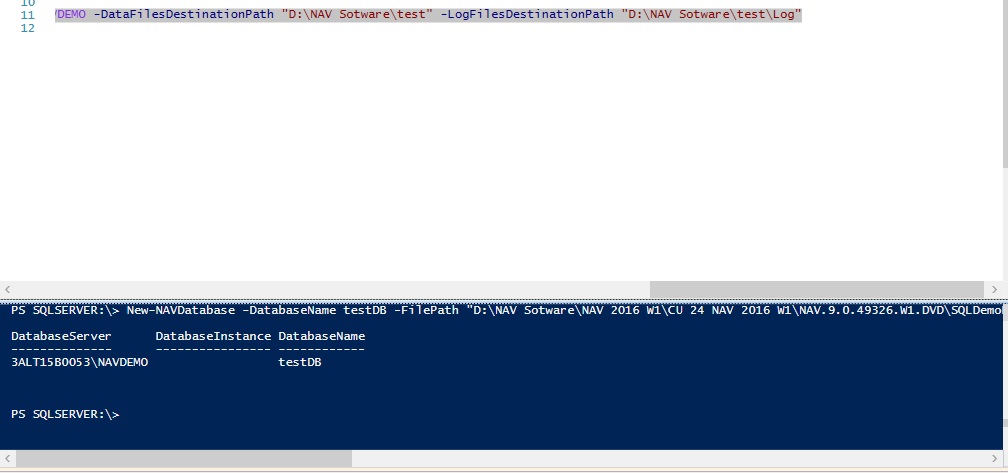
Sample Powershell restore path is as follows

New-NAVDatabase -DatabaseName testDB -FilePath "D:\NAV Sotware\NAV 2016 W1\CU 24 NAV 2016 W1\NAV.9.0.49326.W1.DVD\SQLDemoDatabase\CommonAppData\Microsoft\Microsoft Dynamics NAV\90\Database\Demo Database NAV (9-0).bak" -DatabaseServer 3ALT15B0053\NAVDEMO -DataFilesDestinationPath "D:\NAV Sotware\test" -LogFilesDestinationPath "D:\NAV Sotware\test\Log"

SQL DB Restore Powershell


GST ( Goods and Service Tax - India) Setup in Microsoft Dynamics Dynamics NAV

I know everyone is searching for a good GST material that can help easy GST implementation which required to be done on all the Microsoft Dynamics NAV users across all India. According to Government of India this will be effective from July 01 2017. Hope you already read introduction of GST if not then advised you to please read GST : Goods and Service Tax India
In this post I am going to explain you GST implementation setups required to be done as per practical experience. According to me GST setups will be very easy if you understand the process and setups in meaningful manner. So let us start one by one. 

Summary of setups required to be performed to activate the GST are as follows
  • GST Accounting Period
  • GST Sub Accounting Period
  • G/L Account Creation
  • States
  • GST Registration number 
  • GST Component
  • GST Claim Set off
  • GST Group
  • GST Posting Setup
  • GST Configuration
  • GST Setup
  • Vendor
  • Customer
  • Item / Fixed Asset
  • G/L Account Card/Resource/Item Charges
  • Company Information and Locations Master
  • Service cost
  • General Ledger Setup for GST
  • Structure

GST Accounting Period

GST Accounting Period creation is the very first setups need to done for GST.

Dynamics NAV 2016 GST Accounting Period Setup Page
GST Accounting Period Setup Page
GST Accounting period setup page looks like above and it can be created via pressing 'New' button available on the top menu list of Home tab.
While clicking this New button system will create new line for you and need to enter starting date of GST Period. It should be between April 01 and March 31 format. 

Starting Date : April 01 , 2017  (This is due to your Accounting Period starting date is April 01 -2017)
Ending Date : March 31 , 2018

Please close the GST period for April , May and June for current year (2017) to avoid un-necessary posting.

Year Closed : don't do anything for this

Credit Memo Locking Date: 30-09-2018
 Credit memo locking is entered 30-09-2018 due to as per government rule there is a time limitation after GST to create the credit memo when financial year closing happend. 

Annual Return Fixed Date: 30-09-2018
Annual return fixed date is the date that which government declared as last date of submitting the returns.

GST Sub Accounting Period

GST Sub Accounting period page is used to define the  Month wise definition against the GST Accounting period created on the previous step.
GST Sub Accounting Period in Dynamics NAV 2016

              GST Sub Accounting Period

For creating the new "GST Sub Accounting Period" open the GST Accounting Period and go to Action Tab. Then click on to 'Create Sub Period". Enter the details to create the Sub Period values.
Starting Date: July 01 - 2017  (Rest of the years it should be April 01 of corresponding Year)
No of Periods: 9    (Rest of the years it should be 12)
Period Length: 1M 

G/L Account Creation

Required to create some GL Account numbers for the tracking of GL Account wise transaction on system for GST transactions.

Under Receivable required following set of account numbers need to create

  • IGST Rcvble Acc
  • SGST Rcvble Acc
  • CGST  Rcvble Acc
  • IGST Rcvble Acc(Interim)
  • SGST Rcvble Acc(Interim)
  • CGST Rcvble Acc(Interim)
  • GST Refund Acc
  • SGST Rcvbl Acc. Interim(Dist)
  • CGST Rcvbl Acc. Interim(Dist)
  • IGST Rcvbl Acc. Interim(Dist)
  • CGST Rcvbl Acc. (Dist)
  • SGST Rcvbl Acc. (Dist)
  • IGST Rcvbl Acc. (Dist)

Under Expense / Payable required following set of account numbers need to create

  • IGST Payable Acc
  • SGST Payable Acc
  • CGST Payable Acc
  • IGST Payable Acc(Interim)
  • SGST Payable Acc(Interim)
  • CGST Payable Acc(Interim)
  • GST Expense Acc
GL Account Creation process please refer our Account Number creation post.

Purpose each account will explain during next setups and upcoming process training post.

States


For setting up State Code ( GST Reg. No) need to open State page and then enter the 2 digits unique State code for GST creation purpose. GST Registration Process explained as next step.


State Page : State Code ( GST Reg. No) setup in dynamics NAV
State Page : State Code ( GST Reg. No)


GST Registration number

Registration Number under GST is called Goods and Service Tax Payer Identification Number (GSTIN).
GST Registration Number in Dynamics NAV
GST Registration Number
First 2 Digits should be State Code
3 to 12 digit Should mention PAN number of the company. That means if one company having 3 location registered under different PAN number then need to maintain different GST number. 
13th Digit should mention Entity Code
14th digit should enter the Check Digit Code
15th digit should enter the Blank

GST Component

GST Component is used to define the components of GST like CGST, IGST and SGST etc.

GST Component in Dynamics NAV
GST Component : Setup
Create the setup one by one by clicking the New button. Enter the details in following manner
  1. CGST
  2. IGST
  3. SGST
You should enter the setup just like mentioned on above image.

GST Claim Set off

For doing the GST Claim set off setup required to open the GST Component Page first and then click on to 'Get Claim Set off' button.
GST Claim Setoff setup Dynamics NAV
GST Claim Setoff
For creating the GST Claim setoff page should follow below setup format

CGST Component
GST Component Code: CGST
Set Off Component Code: IGST
Priority: 1

IGST Component
In this required 2 line setup
GST Component Code: IGST
Set Off Component Code: CGST
Priority: 1

GST Component Code: IGST
Set Off Component Code: SGST
Priority: 2

SGST Component
GST Component Code: SGST
Set Off Component Code: IGST
Priority: 1

GST Group

GST group is the place where Goods and Services of similar nature are grouped. Each group is assigned a group code. Remember by the help of this code only creating the actual GST setup. This page will look like following.
GST Group Setup in Dynamics NAV
GST Group Setup
 For any GST Group, if the Place of Supply is different from what is defined in GST Dependency Type, then the same can be defined in GST Group Setup. If for a GST group, Place of Supply is defined in GST Group Setup, then the same flows to GST Place of Supply field in Sales lines. If it is not defined, then GST Dependency Type shall flow to GST Place of Supply field in Sales lines. This GST Place of Supply field in Sales lines is a user editable field.  

  • System validates shipping location state code and place of supply state code with GST configuration setup for any matching line and triggers the tax accordingly.  
  • Example: For Advertising Services, if Place of Supply is Ship to Address and the same is defined in GST Group, then GST Place of Supply field in Sales lines is auto-populated with Ship to Address. If the ship to address is, Karnataka and the shipping location is Tamilnadu, and then system checks for matching line in the GST configuration set-up and triggers the tax rate accordingly.  
  • Place of Supply can also be defined for each GST Group. Place of Supply is critical in determining whether it is an interstate sale or intrastate sale. Place of Supply can be Bill to Address, Ship to Address or Location address.   
  • If Place of Supply is not defined in the GST Group, then system considers GST Dependency type defined in Sales and Receivable Set-up as Place of Supply.   


GST Posting Setup

General Ledger Account for each component is defined state-wise here. Sample image of GST Posting Setup is as follows.
GST Posting Setup in Dynamics NAV
GST Posting Setup
Following setups needs to setup on GST Posting Setup of Dynamics NAV.
  • State Code
  • GST Component Code
  • Receivable Account
  • Payable Account
  • Receivable Account (Interim)
  • Payables Account (Interim)
  • Expense Account
  • Refund Account
  • Receivable Acc. Interim (Dist)
  • Receivable Acc. (Dist)

GST Configuration

This setup aids the system in determining the taxable state based upon 
  • Dispatching state code and customer state code for Sales
  • Receiving state code and vendor state code for Purchases
  • Determining the taxable jurisdiction enables the system to pick up the tax percentage applicable.  
  • For an export transaction, customer is located outside the country hence customer state code is blank. For an import transaction, vendor state code shall be blank, as vendor is located outside the country.  
GST Configuration in Dynamics NAV
GST Configuration

GST Setup


  • The percentage and effective date for each GST component is defined state-wise here.  

  • If GST State Code is blank, then percentage and effective date defined for a GST Component is applicable for all states where there is no specific entry for such GST Group. For example, if Advertising Service has a uniform CGST rate in all states except Delhi, then instead of defining it for each state, it can be defined only once keeping state code as blank. A separate line can be created for Delhi state with Delhi specific percentage.  
GST Setup Dynamics NAV
GST Setup

Vendor

Vendor Page with Tax Information having option to define the GST setups
Vendor Setup - GST Dynamics NAV
Vendor Setup - GST
GST Registration No : under this field select the GST Registration number of Vendor
GST Vendor Type: 

  • Registered
  • Composite
  • Unregistered 
  • Import
  • Exempted
Registered
A Registered Vendor is a person registered with GST authorities.

Composite
  • A Composite Vendor is a vendor whose aggregate turnover in a financial year does not exceed fifty lakh rupees and has opted for Composition scheme. A composite vendor neither collects tax from the recipient of supplies nor passes on any credit of Input Tax. Hence, no GST is computed if the purchases are made from a composite vendor.
  • A composite vendor has to register himself with the GST authorities and hence Registration No. is mandatory in Vendor Card, if the Vendor Type is selected as Composite. State Code is also mandatory.
  • A composite vendor cannot be engaged in supply of services and cannot make inter-state supplies of goods. However, system allows interstate purchases from a composite vendor and service purchase
Unregistered 
  • Persons whose aggregate turnover in a financial year does not exceed twenty lakh rupees are not required to be registered with the GST authorities. Such persons are called Unregistered Vendors. Any purchases from unregistered vendors attract Reverse Charge i.e. the purchasers themselves has to pay tax to the government.
  • Interstate purchases from an unregistered vendor shall not arise, as any person irrespective of his turnover has to register with the authorities, if he is making an interstate sale.
  • GST Vendor Type shall be unregistered in Vendor Card to handle this scenario. State code and GST Registration numbers are not mandatory fields for an unregistered Vendor.  
  • The purchasing user has to issue self-invoices under GST, if the purchases are made from an unregistered vendor. The user can issue a self-invoice in the system by selecting self-invoice from the dropdown of Invoice type in Tax Information tab of purchase documents.
Import
  • Bringing goods to India from a place outside India is import of goods. For Services, if the supplier is located outside India, the recipient is located in India and the place of supply is in India, then it is called Import of services.
  • Purchase of goods and/or services from a foreign vendor is subject to Reverse Charge i.e. the person importing goods or services has to remit tax to the government. Import of goods are subject to both customs duty and IGST whereas import of services are subject to IGST. There is another scenario of importing services from associated enterprises. Accounting Entries differ in each scenario.
  • GST Vendor Type shall be Import in Vendor Card for a foreign vendor. Registration Number and State Code are not mandatory fields in Vendor Card.
Exempted
  • A vendor who is exempted from payment of GST either by Central or State GST authorities is known as Exempted Vendor. An exempted vendor neither collects tax from customers nor pays any tax to the government. No GST Entries are generated in the system, if GST Vendor Type is exempted.
  • This vendor type can also be used to handle a scenario where purchase of only certain goods and services from an Unregistered Vendor is subject to reverse charge and the remaining are exempted. (Law is not clear as of now). State Code and Registration No. are not mandatory for the exempted vendor in Vendor Card. 

Customer

Customer master page with Tax Information having option to define the GST setups
Customer GST Setup dynamics NAV
Customer GST Setup
GST Customer Type : Customer type can be Registered, Unregistered, Export, Deemed Export or Exempted. User has to select the appropriate Customer type from the dropdown. 
GST Registration Type : Registration type can be GSTIN (Goods and Services Tax Payer Identification Number), UID (Unique Identification Number), and GID (Government Identification Number). Appropriate type shall be selected from the dropdown. 
GST Registration No. : The 15-digit GST Registration Number shall be entered here. Registration number is mandatory if GST Customer Type is Registered or Deemed Export. 
E-Commerce Operator : This field is activated

Item Master/Fixed Asset Master
GST Group Code : GST Group code relevant for the item/Fixed asset shall be selected here. GST Group codes created in GST Group Setup appears as dropdown here. 
GST Credit : GST Credit can be Availment or Non-Availment. This field by default displays Availment. If credit cannot be availed on any item/fixed asset, then Non-Availment shall be selected manually from the drop down.  
HSN/SAC Code: All HSN Codes for GST Group code selected above shall be displayed as a dropdown for this field. User has to select appropriate HSN code. 
Exempted: This field is checked if the item is exempted from payment of tax. 

G/L Account Card/Resource/Item Charges

GST Group Code : GST Group code relevant for Service/Resource/Item charge shall be selected here. GST Group codes created in GST Group Setup appears as a dropdown here. 
GST Credit: GST Credit can be Availment or Non-Availment. This field by default displays Availment. If credit cannot be availed on any service, then NonAvailment shall be selected manually from the drop down.  
HSN/SAC Code: All SAC Codes for GST Group code selected above shall be displayed as a dropdown for this field. User has to select appropriate SAC code.
Exempted: This field is activated if the Service/Resource/Item charge is exempted from payment of tax.

Company Information and Locations Master

GST Registration No. : The 15-digit GST Registration Number shall be entered here. 
GST Input Service Distributor : This field is an automatically activated Field, if Input Service Distributor is activated in GST Registration Nos

Service cost

GST Group Code : GST Group code relevant for the service shall be selected here. GST Group codes created in GST Group Setup appears as dropdown here. 
HSN/SAC Code: All SAC Codes for GST Group code selected above shall be display as dropdown for this field. User has to select appropriate SAC code. 
Exempted: This field is activated if the Service is exempted from payment of tax. 

General Ledger Setup for GST

GL Setup also required some setup to work the GST functionality properly. GL Setup will look like following section added after GST in India.

General Ledger Setup for GST
Following are the new fields and its definition
GST Rounding Precision:  This is used to define the GST rounding precision for the trasactions.
GST Rounding Type: Here you can define the type of rounding precision working. You are having options of Nearest , Up and Down. That means if  you have specified rounding precision as 0.5 and Nearest as Rounding type then system always try to bring the value to the nearest possible digit.
IGST Payable A/C [Import]:  Here you have to specify the IGST Payable Import account number.
GST Recon. Tolerance: Max tolerance allows in GST.
GST Distribution Nos and Distribution Invoice Nos are number series to handle the same.

Structure

GST Calculation required all new Structure setup as well. Following image showing sample Structure for the GST structure.

GST TAX Structure dynamics NAV
GST TAX Structure 
Structure Details 
Structure details line having following setups required to calculate GST
Type: GST
Tax / Charge Code: GST
Also required following field with select True
Include Base , Include Line Discount , Include Invoice Discount

Keep on visit Navision Planet for latest updates and training documents for GST and latest changes in Microsoft Dynamics NAV.

Jubel Thomas

{picture#https://plus.google.com/u/0/photos/116645982191572612106/albums/profile/5718535508567382818} Having 9+ years of Dynamics NAV Experience with Modules like Finance, Sales, Manufacturing, Warehouse, Purchase, Human Resource etc. Also know LS retail, Dynamics AX, Business Intelligence. {facebook#https://www.facebook.com/Navision-Planet-347570178709579/} {twitter#https://twitter.com/NavisionPlanet}

Contact Form

Name

Email *

Message *

Powered by Blogger.